20 Dec 2011

39 steps to quickly build a simple 3d character in Maya


Today I studied character building - something I managed to avoid ever learning to do properly from scratch before. I have documented all the stages step by step from this excellent tutorial by I found on Youtube. I managed to make two characters in a couple of hours. the result is a simple figure but it is perfectly structured for adding further levels of detail, textures rigging etc. The whole thing is made of 8 sided polygon spheres and cylinders. The same few processes needed are repeated using a few tools under Polygons/ Mesh and Polygons/ Edit Mesh in Maya.


step 1. make an 8 sided poly sphere

step 2. duplicate + stretch for head, slightly forward.

step 3.  for arm and leg use a poly cylinder - 8 sided with no caps

step 4. at top and bottom select the edges at 45 degree angles

step 5. delete these edges leaving quads at top and bottom.

step 6. do the same to the head sphere

step 7.  For neck,  simple poly cylinder with 8 sides - position between.

step 8. shape the body sphere front and back.

step 9. select four facets at right hip and delete them.

step 10. shape top of leg to approximate size of hole.

step 11. combine two poly meshes and use bridge to close the gap. ( 0 divisions )

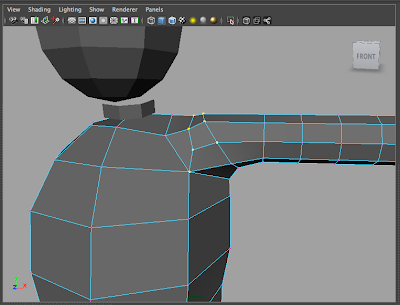
step 12. poly extrude two shoulder area facets a little way.

step 13. delete the two selected faces plus the two extruded ones below them.

step 14. edit the vertices at the top of the arm and shoulder to make a rough match.

step 15. combine arm and body meshes. bridge the edges ( 0 divisions )

step 16. shape up the resulting shoulder

step 17. delete the top four faces of the body under neck.
step 18. combine and bridge, adjust if needed.

step 19. from behind head choose these four faces to delete.

step 20. move head closer and adjust vertices on neck and head to match up.

step 21. combine and bridge head and neck, adjust if needed.

step 22. select all faces on left side, then delete them.

step 23. go to mirror geometry and mirror it ( on -x axis )

step 24. hide the body model and make a 3x3x1 cube like this for the hand. If you want four fingers make it 4x4x1.

step 25. tweak the points to give a slight curve and a thinner first column.

step 26. extrude the facets above to pull out a thumb and fingers.

step 27. when hand is shaped choose 3 facets at wrist and delete them ( this should still be only 3 facets even with a four finger hand )

step 28. combine and bridge, adjust if needed. Check with smoothing on ( press 3 )

step 29. for  afoot make another simple 8 sided poly sphere and position below leg.

step 30. again select and delete front and back 45 degree edges.

step 31. choose four facets below leg and delete them.

step 32.  shape hole in foot and bottom of leg to match edges.

step 33. select all bottom vertices on foot

step 34.  scale vertices under the foot like this.

step 35. insert an edge using Insert Edge Loop Tool.

step 36. combine then bridge. then shape the foot.

step 37. again select and delete the left sided facets

step 38. mirror geometry again to get figure complete.


step 39. change to a blinn material to see form and shape it up if needed using the transform tools with soft select and reflection turned on. 

with his friend who has four fingers.

19 Nov 2011

Tessellating texture maps

I have been looking at making simple tessellating tiles of the sort used for texture mapping games or large scale 3d scenes which need to keep the amount of textures down. There is a real trick in hiding the unwanted visible repeat patterns. The human eye is so good at spotting patterns in nature that the small tiles often give themselves away as subtle tartan or checked repetitions. The tiles I made have been a standard 128 x 128 pixels. The examples show a few of them made into larger areas with successful blending of the seams.


There are some great grabs from Google Maps of trees. I haven't tessellated them yet but they will be great.


January 2012 update
Dungeon textures.

I have recently completed a set of game graphics for an as yet unpublished and therefore unnamed title. This is to be a dungeons and dragons style pixel art side scrolling platformer . If that sounds overblown it's because I'm sort of still enjoying picking up the lingo - games world v different from the VFX + video world I'm from. But having played and designed tons of role playing games in the past, II felt pretty confident in getting this done. 


recombined tiles - still a few seams showing along shadow areas.
The artwork comprised of 192 tiles in a grid  8 x 24 . Their are four unique types of tile - each one was labelled as a type 1,2,3 or 4. For example A Type2 would only tesselate with  a Type1 or Type3 horizontally.  This still allowed for a very large amount of combinations but still eliminated an obvious repeat pattern showing up across the level. Vertically there were only shadowed or non-shadowed tiles so making tessellation more simple in that direction.
close up of two joined tiles

a test level made up using every tile type

close up on ruined wall area

Isometric Dungeon Floor Tiles

These were created as an experiment and worked very well. The next stage would be to include walls at the back of each section - or maybe some doors or other upright set dressing. It is really just a floorplan set to a 45 degree angle making amny triagulated combinations of square floor texture tiles.

A test layout using the tiles - endless dungeons possible

actual tiles - each square one of dozens of combinations - this is only half of the full set- every square tile can tesselate with any other.